In the last lesson we took a chord regression and we looked at some pretty detailed breakdown of all the different motions that the hands can make, and in the end it sounded pretty cool. In this lesson we want to continue with that theme and explore some more details for the right hand that can really kind of add some character to your strumming.
So we’re going to look at four in particular that are probably the most common ones. Almost all guitar players use them in one way or another. Most all of us certainly know about them and they’re good ones to know.
So let’s start with arpeggio technique. Now again, an arpeggio is kind of like a broken chord. It’s usually when you just take a chord and play the chord notes one after the other, broken up like that. There’s two basic schools of thought one that the right hand can do.
One school of thought says, if I’m plucking downward, say starting on the fourth string and moving to the first, just keep plucking down one after the other, in fact your pick can come to rest on the next string. You know it doesn’t have to go pluck, pluck, pluck, pluck. You should just kind of lay the pick on to the string. And if you’re doing up’s, up, up, up, up. So that’s called consecutive picking, you just keep consecutively picking the direction you need to go. And if you were to loop it for say, the bottom four strings, I might start on the fourth and go down, down, down and on the last string I’m going to skip over it and now catch it with an up because it’s part of a new batch of up’s. So down, down, down, skip, up, up, up, skip for a new batch of downs. So that becomes down, down, down, up, up, up, down, down, down, up, up, up. So that’s consecutive picking.
The other school of thought says alternate picking. No matter where you go just keep alternating. So that means down, up, down, up, down, up, down, up, down, up, down, up. And people who like that technique say that it kind of keeps them in a flow of you’re just constantly doing the same motion. Whereas the downs it’s kind of like one motion and then a totally different motion. So you can experiment with the two, decide which one works for you. That’s arpeggio.
The next one is a little bit related to arpeggio. Some people call it alternating base note, or note and chord. There’s no real clean name for it, but the basic idea, let’s take my D chord again, is I’m going to pluck one string, and think of it as like a base string, and then I’m going to hit the chord. So base, four, base, four. Maybe I use different base notes, like [MUSIC]. Maybe this is like in country music or, [MUSIC] something like that.
So that technique and the arpeggio technique they share a similar challenge and that is the right hand has to be pretty calm and pretty stable in order to accurately pluck the notes. So personally I like to drop the fingers down onto the face of the guitar very lightly, they still can move, and that’s for when I pluck the strings. Now when I go to strum I’m going to kind of bring them up or lift them off the face of the guitar so it’s still nice and loose.
So for example I’m going to combine arpeggio technique and the alternating base. So maybe I go arpeggio, and now my alternating. So when I’m doing the notes the finger really just glides on the face of the guitar, and then when I need to strum it can kind of come up a little bit.
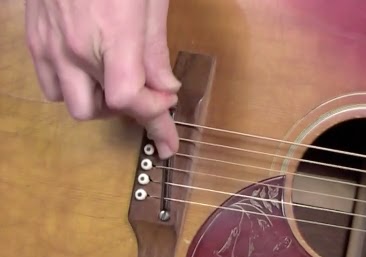
So there’s a couple more techniques we’d like to talk about, and they have to do with muting. Muting makes a totally different timber, a different tone out of the guitar. There’s two ways you might mute, palm muting which is done with the right hand, and string muting which is done with the left hand.
In palm muting you use this edge of the palm here, almost like you were doing a karate chop or something, and you lay it down across the saddle of the guitar, sort of like this, and then the pick kind of comes over. Whatever pick technique you use, you just adapt it so that your palm remains on the saddle. So here’s a fifth string A no mute. Here’s fifth string A with a palm mute. And here’s fifth string A with too much mute. There’s almost no sound at all. So you have to make sure you’re right on the saddle and you can control how much mute you get.
Let’s say I’m doing like an acoustic rock thing, I might use it. All right, maybe it’s more like a rock thing, like [MUSIC]. So it’s a pretty common technique in different styles.
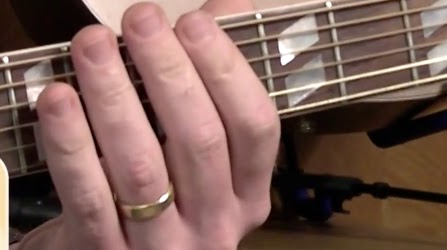
The other hand can do string muting. And string muting pretty much makes a percussive sound. So it doesn’t really create any pitch or any tone, and it’s something that you can squeeze in between chords. So for example, let’s say I’m going to use D and G. There’s my D, there’s my G. I’m going to do a little strumming on the D, and after I strum the G I’m going to do some string muting. You get the idea. So that creates almost like a drum like effect. That’s pretty cool.
So these different techniques, it’s a little bit rare that you find them all in one song, but you might find a couple of them, and they can be sandwiched between strums or notes or almost anything. They all take quite a bit of practice to develop, but they’re really cool kind of tricks to have in your bag. So try maybe one or two of them and see if you can kind of get the hang of it. It’s a better idea to really work on one or two and spend a good amount of time then to put your energies into trying all four and finding that it takes a really long time. If you become a great arpeggiator and you don’t know about the other ones quite yet, that’s fine, just work on your arpeggio and then work on your other ones afterwards.
So try these techniques but remember rhythm with all of this stuff is the most important thing. So if any one of these techniques kind of means that you sacrifice your rhythm, it’s better to just kind of stick with the metronome and develop a really strong sense of the beat and when to change the chords, and then these are all just kind of like the cherry on top; little details that you add once you got the basic song grooving. So have fun with it and we’ll see you in the next lesson.